
One of the most common questions I’ve seen recently has been “how do I get to inbox zero” and “how do I actually set up my inbox so I’m not crying every time I go in there?” Fair question. As business owners, we’re constantly getting new emails. All day, every day, they never stop. So how do you set your email inbox up in a way that is going to make things easier and not harder?
I’ve been setting up inboxes for my clients for years (like 8+) so I know a thing or two about it. Not only are we going to get into the 5 things you’re going to do to get your inbox to a place where you don’t cry, I’m also going to tell you how to keep it that way. So let’s get into it, mk?
Give your inbox a clean slate
If you’ve got hundreds (or thousands) of emails in your inbox, I’m betting you’ll want to start with a clean-ish slate. Unless you’re planning to go through every email, it’s going to be faster to archive it all. The best thing about archiving is that it’s still searchable and is never really gone.
In the search bar of Gmail, you’re going to search “older_than:1y”. (You can also swap out the “1y” for 6 months (6m) or any other timeframe. This is going to pull up all emails within your chosen timeframe or older. You’re then going to select all and archive. You can either keep selecting all per page, or you can click “Select all messages that match this search” and archive them all in one go.
Set up your inbox label system
There are so many ways to set up your inbox labels, so this part’s gonna be allllll about your personal preference. BUT because I know you’re also looking for some ideas, let’s get into it.
In general, I don’t think you need to have a crazy amount of labels. As I mentioned in the last part, if you’re archiving emails and not deleting them, then you can still search for any email. The main times you would definitely want emails labeled are if it’s going to be easier to have them filed away than to search for them. If you want to go the more minimalist route with your labels, at minimum, I’d go with:
- Needs Response or Action Needed (we’ll get into this in a sec)
- Waiting On (and this one too)
- Finance (make one per year)
- Newsletters
- Notifications (you could set this up to have sublabels for each platform you get notifications on too)
If you want more labels, then you’ll also want to look into setting up ones like:
- Client Reviews (this will be where you’ll save emails when clients are singing your praises)
- Legal
- Presentations/Speaking/Collabs
- Courses
- Leads + Clients (you can also make sublabels per client or service type)
It’s controversial, but I kinda love a “Read Later” label. Sometimes I’ll read an email but I’ll be in a place where I can’t quite take action on it, but I want to save it somewhere. That’s when it’ll go in the “Read Later” label — the key thing is to not make this your junk drawer. I use this one more for those newsletters where they have a mic drop moment I want to remember and need to write down/store elsewhere or something actionable.
We’ll get into the actual management of your inbox a little further down
Create email aliases for better organization
One of my favorite things to set up are email aliases, also called an alternate email address. It’s like having multiple email addresses, but they all go to one inbox. One of my favorite ways to use it is for newsletters. Whenever I sign up for a newsletter, I do it under my newsletter alias. I’ll get more into how I utilize that alias alongside filters in the next section.
If you’ve never set up an email alias in Gmail before, check out this blog post where I walkthrough each step to do so.
Automate your inbox with filters
Filters are your inbox’s best friend. Filters are what will automate the incoming emails to get to the right place or just keep things more organized. Once you’ve set up any aliases, I’d also recommend setting up filters to go with them.
As I mentioned, I have an alias set up for newsletters I sign up for. I also have a filter set up so that all emails that go to that address are labeled as a Newsletter. This way, if I can choose to either create more filters that will have the email skip my inbox and go straight to the Newsletter label or it’ll stay in my inbox. But as soon as I’ve finished reading it, I can archive it knowing it’s already tagged for Newsletters in case I want to read it again without having to label it manually.
There are two ways to create a filter. The first is by building it from scratch (ie. creating ones for your aliases) and the second is to do it within an email.
To build a filter from scratch, you’ll go to Settings > Filters and Blocked Addresses. You’ll then search for “Create a New Filter”, a dialogue box will pop up on your screen, fill out the information and create your filter.
To create a filter based on a specific email, either from who’s sending it, a subject line, etc. start by finding the email you want to create a filter for. Then, click the 3 dots at the top of the email and click “filter messages like these”. It will automatically populate the “From” section, and behind the dialogue box will show you what emails it’d be filtering based on that. You can then add more details if you want, or just roll with the From. Then click “Create Filter”, which will let you choose the steps the filter will take each time that type of email is received.
Change your inbox layout to a Priority Inbox
This is how you’re actually going to have a clean inbox. By default, your inbox is set up so that all emails are just *there*. The problem with that is there’s no organization to that, so you’re literally seeing everything. The solution though is actually easy: you’re going to change your inbox to “Priority Inbox.
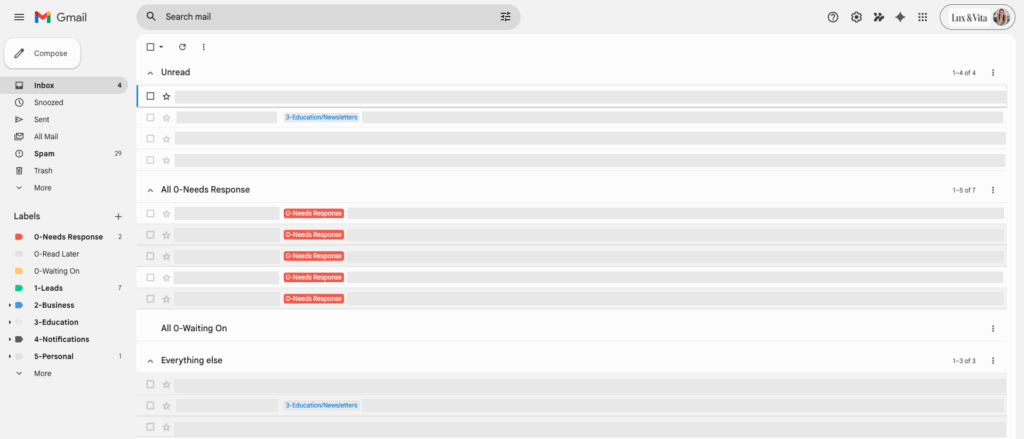
A Priority Inbox is essentially going to organize your inbox into 4 sections based on labels you choose.
While you can choose to use any labels for this, I’d recommend setting them to:
- New & Unread
- Action / Needs Response
- Waiting On
- Everything Else (these are all of the opened emails in your inbox)
Here’s what a Priority Inbox looks like once it’s been set up:
How to set up a Priority Inbox in Gmail
- Click the gear icon in the top right corner
- Click on “See all settings”
- Click the tab “Inbox”
- For Inbox Type, select “Priority Inbox”
- You’ll then update the 4 dropdown options to how you want your inbox set up — you may need to click “More Options” to see all of your available labels
- Save changessss
Side note: You can change how many emails you see in each section too, by clicking the 3 dots on the far right side of the section.
How to actually keep your inbox clean
Now that you’ve set up your inbox to work for you, how do you keep it that way? By being ruthless about your emails.
I’m joking, but also not.
When you go into your inbox you need to stop hemming and hawing about it.
If it’s a newsletter and you don’t ever read them, unsubscribe. You can always resubscribe. If it’s a newsletter that you want to keep getting but you aren’t in the space to read them right now, set up a filter to have it skip your inbox and go to another label (like Newsletter). It’ll be there when you have the capacity to read it.
If it’s a bunch of notification emails (ie. your CRM, PMS, Google Docs, etc.) decide if you actually need all of those notifications or not. Either turn them off or (again) set up a filter so they go to your Notifications label. I’ve even set up automations where specific notification emails that come in skip my inbox and send me a message in Slack instead.
All other emails you’re going to get into the habit of doing the following:
- Responding and labeling it as “waiting on response” if you need to follow-up on it if they don’t reply back
- Responding and archiving it — stop keeping it in your inbox if you’re done with it. This is why your inbox is a hot freaking mess.
- Moving it to “Needs Response” — from here, either keep it as read so it goes into that section OR mark it as unread, that way it stays at the top of your inbox but is screaming at you to reply (especially if you make the label red 😉)
- Snooze it — if you’re not ready to deal with it you can snooze the email. This will literally remove it from your inbox until the time you told it to come back. You can always go to the “Snoozed” section on the left side of your inbox if you want to bring it back sooner.
Wrapping it up
Not surprisingly, it’s going to be the simple systems you set up that you’ll keep up with. And, if you actually use the Archive button your inbox will thank you. Once you’ve taken action on an email, do something with it. Whether you’re archiving it or moving it to a label, for the love of squeaky clean inboxes, stop just leaving it in your inbox.
If you loved this post and want to get more content like this in your inbox (😂) sign up for Lightly Salted. It’s my weekly-ish Sunday email that’s part operations insight, part business reality check, and always straight to the point (with a little edge, because we keep it real around here). And when you do, make sure to sign up with your fancy new newsletter alias so you can keep your inbox lookin’ good.
leave one here
comments